Introduction
A friend of mine, a keen professional guitar player, wanted a small box to control settings of a looper (a box with which can be used to store audio fragments, loop and stack these fragments).
MVP
- MIDI out (DIN)
- at least three (configurable) push buttons which send a MIDI control change message
- a configurable MIDI channel
This system is realized with a Teensy 3.6, but a much cheaper Teens LC will work as good.
Step 1: Get the MIDI out going
If you use a Teensy LC or 3.x this is a very easy exercise:
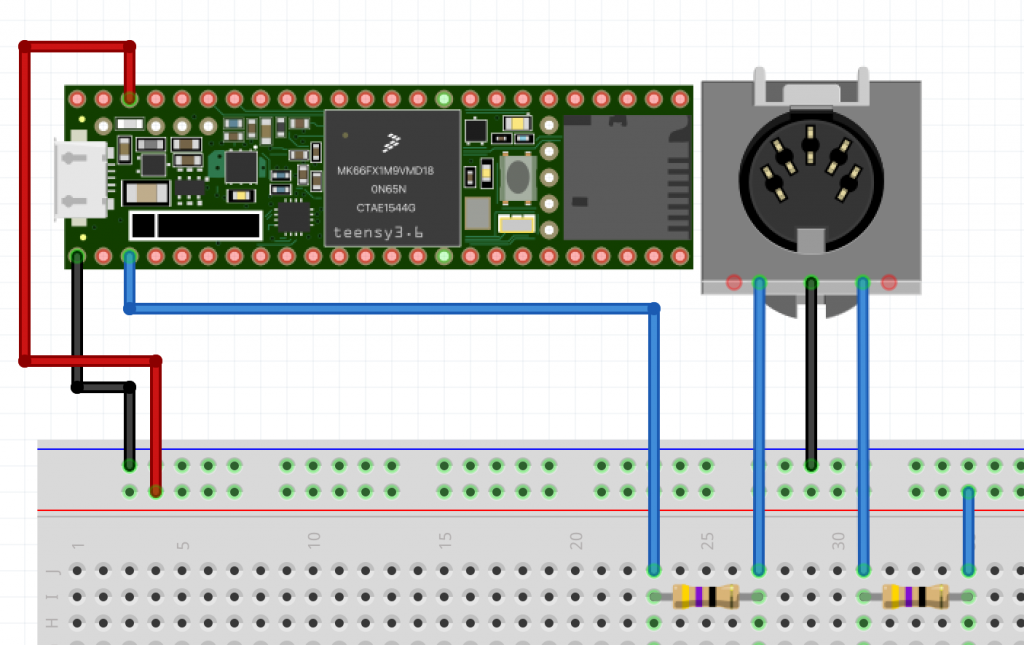
Be aware that Arduino is based on 5V and then the resistors have to be different (220 Ω). Too low resistors will cause too high currents on the instrument’s side. So it is not my fault, if you have to send in your Dave Smith…
This quite simple setup can be used by our (quite simple…) first sketch. In step one we want to play a halftone scale from C1 to C2, each note will be played for a 10th of a second and then stopped. The loop should do nothing.
#include <MIDI.h>

// connect the MIDI library to serial port TX1
MIDI_CREATE_DEFAULT_INSTANCE();

void setup() {
  MIDI.begin();
  for (int note=60; note <= 72; note++) {
      MIDI.sendNoteOn(note, 100, 1);
      delay(100);
      MIDI.sendNoteOff(note, 100, 1);
  }
}

void loop() {
}
You will have to connect some MIDI instrument via the old fashioned MIDI cable, and have to listen on MIDI channel 1. If you don’t hear anything, you may switch on your amp, move the MIDI plug to your instrument’s MIDI in, or swap MIDI pin 4 and 5 (a wrong connection won’t do any harm).
Step 2: ‚Press the sustain pedal‘ if a push button is pressed
We will use the code from above, but will check the status in the loop() function. To avoid multiple sends we have to capture the send status, thus we only send the control message ’sostenuto pedal = ON‘ if the button is pressed AND the message hasn’t been sent already.
Here comes the fritzing board:

Step 2 a): Send a C when you press the button (sketch is the same)
#include <MIDI.h>

 // connect the MIDI library to serial port TX1
 MIDI_CREATE_DEFAULT_INSTANCE();

 const unsigned int PUSH_BUTTON_PIN = 2;
 const byte INTRO_NOTE = 108;
 const byte BUTTON_NOTE = 60;
 const byte CHANNEL = 1;
 const byte VELOCITY = 100;

 bool sent;

 void setup() {
   sent = false;
   MIDI.begin();
   pinMode(PUSH_BUTTON_PIN, INPUT_PULLUP);
   MIDI.sendNoteOn(INTRO_NOTE, 100, 1);
   delay(500);
   MIDI.sendNoteOff(INTRO_NOTE, 100, 1);
 }
 void loop() {
   unsigned int buttonState = digitalRead(PUSH_BUTTON_PIN);
   // if button pressed and not  sent
     // send note on
   if (LOW == buttonState && !sent) {
     MIDI.sendNoteOn(BUTTON_NOTE, VELOCITY, CHANNEL);
     sent = true;
   }
   // if button not pressed and sent
     // send note off
   if (HIGH == buttonState && sent) {
     MIDI.sendNoteOff(BUTTON_NOTE, VELOCITY, CHANNEL);
     sent = false;
   }
   delay(10);
 }
Step 2 b): Send the Control Change when you press the button
#include <MIDI.h>

MIDI_CREATE_DEFAULT_INSTANCE();

const unsigned int PUSH_BUTTON_PIN = 2;

const unsigned int SUSTAIN_PEDAL = 64;
const unsigned int SOSTENUTO_PEDAL = 66;

const byte INTRO_NOTE = 108;
const byte BUTTON_NOTE = 60;
const byte CHANNEL = 1;
const byte VELOCITY = 100;
const byte CC_OFF = 0;
const byte CC_ON = 127;

bool sent;
void setup() {
  sent = false;
  MIDI.begin();
  pinMode(PUSH_BUTTON_PIN, INPUT_PULLUP);
  MIDI.sendNoteOn(INTRO_NOTE, 100, 1);
  delay(500);
  MIDI.sendNoteOff(INTRO_NOTE, 100, 1);
}

  void loop() {
    unsigned int buttonState = digitalRead(PUSH_BUTTON_PIN);
    if (LOW == buttonState && !sent) {
      MIDI.sendControlChange(SUSTAIN_PEDAL, CC_ON, CHANNEL);
      sent = true;
    }
    if (HIGH == buttonState && sent) {
      MIDI.sendControlChange(SUSTAIN_PEDAL, CC_OFF, CHANNEL);
      sent = false;
    }
    delay(10);
  }
Step 3: Add DIP switches for the controller number and the MIDI channel
There are 16 MIDI channels (1..16) which could be defined by a four way DIP-switch connected to ground and four input channels. And if we understand how to read these four ( 4 bit) switches, we easily could extend our code to define the control change number (0..127, thus 7 bit).
At the moment we can take this route but we already have in mind that this approach consumes a hefty 11 Teensy input channels.

The code to read the MIDI channel DIP switch is pretty straight forward. Obviously this has to be placed in the setup() function. Since we placed this routine in the setup() function, it will only be read once – during startup.
To be consistent we read from left to right, thus the control channel bit 0 is the left DIP switch labeled with ‚1‘, etc. (BTW: In the original setting I used a 4 way DIP switch instead of two two way ones…)
#include <MIDI.h>

 MIDI_CREATE_DEFAULT_INSTANCE();

 const unsigned int PUSH_BUTTON_PIN = 2;

 const unsigned int SUSTAIN_PEDAL = 64;
 const unsigned int SOSTENUTO_PEDAL = 66;

 const byte INTRO_NOTE = 108;
 const byte BUTTON_NOTE = 60;
 const byte VELOCITY = 100;

 const byte CC_OFF = 0;
 const byte CC_ON = 127;

 bool sent;
 unsigned int channel;

 void setup() {

   sent = false;
   MIDI.begin();

   pinMode(PUSH_BUTTON_PIN, INPUT_PULLUP); // button

   pinMode(3, INPUT_PULLUP);
   pinMode(4, INPUT_PULLUP);
   pinMode(5, INPUT_PULLUP);
   pinMode(6, INPUT_PULLUP);

   channel = digitalRead(6) << 3;
   channel |= digitalRead(5) << 2;
   channel |= digitalRead(4) << 1;
   channel |= digitalRead(3);
   channel++; // 1..16!

 }

 void loop() {
   unsigned int buttonState = digitalRead(PUSH_BUTTON_PIN);
   if (LOW == buttonState && !sent) {
     MIDI.sendControlChange(SUSTAIN_PEDAL, CC_ON, channel);
     sent = true;
   }
   if (HIGH == buttonState && sent) {
     MIDI.sendControlChange(SUSTAIN_PEDAL, CC_OFF, channell);
     sent = false;
   }
   delay(10);
 }
The control change DIP switch will be set up accordingly. But as you can imagine, we are running out of pins pretty quickly. Since we want three push buttons in our sketch, we would need 3×8+4 = 28 ports just for the three buttons.
Future improvements
- Step 4: Add an input shift register to reduce the number of Teensy ports.
- Step 5: Cater for different types of control change messages
- Step 6: Add rotary input controls
- Step 7: Add status save buttons for the rotary controls